
Posts by :
disable forceful SSL redirection in WHM/cPanel
January 19th, 2015Hello,
To disable forceful SSL redirection in WHM/cPanel servers edit below lines in file /var/cpanel/cpanel.config
alwaysredirecttossl=0
requiressl=0
and execute the below script for cPanel to reflect the changes.
/usr/local/cpanel/whostmgr/bin/whostmgr2 -–updatetweaksettings
Now, you should be able to access the WHM, cPanel and webmail with http port 2086, 2082 and 2095 ports respectively.
Thank you for viewing helpinlinux.com
keywords: cpanel disable ssl redirect
Plesk Nginx Poodle Vulnerability Fix
November 1st, 2014Hello Guys,
I happened to work on a client’s Plesk server running Nginx on frontend, where I was asked to fix the recent Poodle vulnerability. I had difficult time to figure out the fix, and I don’t want others to face the same. Hence, created this post.
Step1: Open the Plesk’s Nginx configuration located at /etc/nginx/plesk.conf.d/server.conf and edit the ssl_protocols line to the one below.
ssl_protocols TLSv1 TLSv1.1 TLSv1.2;
Then edit the same ssl_protocols entry on below Plesk configuration updater files,
/usr/local/psa/admin/conf/templates/default/nginxWebmailPartial.php
/usr/local/psa/admin/conf/templates/default/nginxDomainVirtualHost.php
/usr/local/psa/admin/conf/templates/default/nginxDomainVhost.php
/usr/local/psa/admin/conf/templates/default/domain/nginxDomainVirtualHost.php
and then run the below command.
Step2:
[root@pleskNginx1]#/usr/local/psa/admin/bin/httpdmng --reconfigure-all
[root@pleskNginx1]/etc/init.d/httpd restart
Thanks for viewing helpinlinux.com
Debian 6 Bash Vulnerability
November 1st, 2014Hello guys,
I will now let you know the steps involved to protect your Debian6 system from Bash Vulnerability. To check your system against vulnerability, please use the below command
root@debian6:~# env 'VAR=() { :;}; echo Bash is vulnerable!' 'FUNCTION()=() { :;}; echo Bash is vulnerable!' bash -c "echo Bash Test"
If it returns the following output, then your system is vulnerable. You will get the below output
Bash is vulnerable!
Bash Test
To fix this we would need to upgrade bash, the default repository won’t have a bash patch, hence we would need to use an additional repositry. Please find the commands below to complete it.
Step1: Add the below entry to your /etc/apt/sources.list file.
deb http://ftp.us.debian.org/debian squeeze-lts main non-free contrib
Step2: then execute the update commands
root@debian6:~# apt-get update
root@debian6:~# apt-get install --only-upgrade bash
That’s it, now you can test the server using the same testing command which we used earlier.
root@debian6:~# env 'VAR=() { :;}; echo Bash is vulnerable!' 'FUNCTION()=() { :;}; echo Bash is vulnerable!' bash -c "echo Bash Test"
Bash Test
That’s it, your Debain6 system is protected from ShellShock vulnerability.
How to backup multiple databases using percona
October 8th, 2014Hello all,
I checked over the internet and I couldn’t find a possible script to backup multiple databases using percona backup tool. Hence, I wrote it myself. The below script will help us to backup at most 3 databases by providing database names as command line argument the backups will be placed at /disk4(you can change to any folder name that you prefer).

#!/bin/bash
#!/bin/bash
echo $#
if [ $# -gt 0 ]
then
 echo "number of arguments given is $#"
 /usr/bin/innobackupex --include="^$1" /disk4
   if [ $# -gt 1 ]
   then
     echo "number of arguments given is $#"
     /usr/bin/innobackupex  --include="^$2" /disk4
      if [ $# -gt 2 ]
       then
        echo "number of arguments given is $#"
         /usr/bin/innobackupex --include="^$3" /disk4
      fi
   fi
fi
save the above script into a file and execute it using the following syntax.
[user@localhost] # sh perconabackupscript.sh database1 database2 database3
deny access to .bash_profile .bashrc .bash_history apache
October 7th, 2014Hello all,
You would have come across a situation where you had pointed the website to user’s home directory, where the user’s default files like .bash_profile .bashrc .bash_logout and .bash_history will be accessible from browser, which is a security drawback. We can deny access to those files by adding the below configuration file either in main httpd.conf file or virtualhost configuration just below DocumentRoot directive for the respective domains. This will deny access to web clients from viewing the contents of any filename that starts with .bash
       <Files ~ "^\.bash">
            Order allow,deny
            Deny from all
            Satisfy All
       </Files>
Thanks for viewing https://helpinlinux.com
Apache ssl passphrase automatic
September 28th, 2014
Hello all,
hope you are having tough time remembering the pass phrase that you created for apache ssl creation. Well, not anymore. We can disable pass phrase prompt on every apache restart by regenerating the key file without a pass phrase. This topic is made assuming that you already know the pass phrase.
[root@localhost.com ~]# /etc/init.d/httpd restart

Stopping httpd:                                            [OK]
Starting httpd: Apache/x.x.x mod_ssl/x.x.x (Pass Phrase Dialog)
Some of your private key files are encrypted for security reasons.
In order to read them you have to provide the pass phrases.

Server localhost.com:443 (RSA)
Enter pass phrase:

OK: Pass Phrase Dialog successful.
                                                           [  OK  ]
Let’s overcome the above issue.
All we need is to regenerate the key file using our openssl command as shown below.
First let’s take a backup of the key file, for redundency.
[root@localhost.com]# cp -arp /etc/ssl/old.key /etc/ssl/old.key.bak
Now, we will generate the new pass phrase less key as mentioned below.
[root@localhost.com]#  openssl rsa -in /etc/ssl/old.key -out /etc/ssl/new.key
Enter pass phrase for /home/ssl/old.key:
writing RSA key
[root@localhost.com]#
Now, let’s replace the old key with the newly created one and restart apache.
[root@localhost.com]# mv /etc/ssl/new.key /etc/ssl/old.key
[root@localhost.com]# /etc/init.d/httpd restart
Stopping httpd:                                            [  OK  ]
Starting httpd:                                            [  OK  ]
It should restart without prompting the pass phrase, if not you have missed something.
Reference: http://mnx.io/blog/removing-a-passphrase-from-an-ssl-key/
Thanks for viewing https://helpinlinux.com
cannot login to any tty Linux
September 22nd, 2014Hello all,
It been days since I have posted stuffs, I am posting a new issue which I have come across from a client’s system. He come to me saying he is unable to login to Linux machine using root account, and asked me to reset the password. I have logged into console and booted the machine in single usermode and reset the password. However, after booting in normal mode when I enter the password it logs in and disconnects immediately and prompts me to enter username and password again. Sounds fishy right ? I have spend around 2 hours figuring out what has gone wrong. I have checked pam configuration, passwd file entry and everything using cat command. I saw everything was perfect., then later I added a new user and checked and I was able to login to the new account and not any of the old accounts including root account, then I opened the /etc/passwd file using vi command, guess what I have got ? See below.
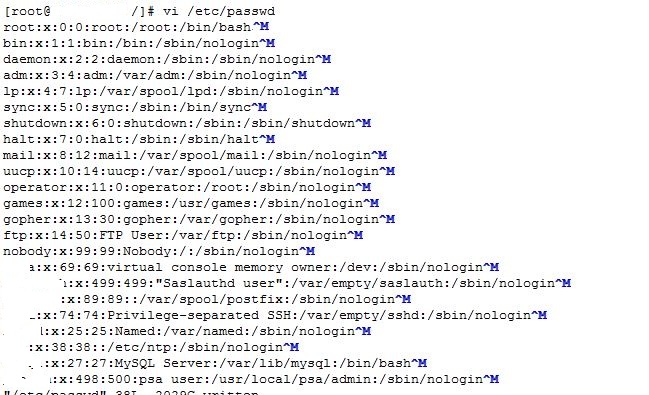
Wow, its in Windows format. Looks like my client or his IT person has downloaded and uploaded the file from windows machine. We can either manual remove the ^M entries at the end of all lines or use the below command provided you have installed dos2unix package in your system.
#dos2unix /etc/passwd
This will fix the issue and you will now be able to login to the machine without issues.
Thanks for viewing https://helpinlinux.com
E: Internal Error, No file name for libc6
July 19th, 2014Hello,
This is a known issue at Ubuntu, where you are not allowed to update or install any packages on the server.
root@machine:~# apt-get upgrade php5*
Reading package lists... Done
Building dependency tree
Reading state information... Done
You might want to run 'apt-get -f install' to correct these.
The following packages have unmet dependencies:
libuuid1 : Breaks: libuuid1:i386 (!= 2.20.1-1ubuntu3.1) but 2.20.1-1ubuntu3 is installed
libuuid1:i386 : Breaks: libuuid1 (!= 2.20.1-1ubuntu3) but 2.20.1-1ubuntu3.1 is installed
E: Unmet dependencies. Try using -f.
To fix this you can do the following command.
sudo apt-get clean

sudo apt-get install -fy

sudo dpkg -i /var/cache/apt/archives/*.deb

sudo dpkg --configure -a
reference: http://forumubuntusoftware.info/viewtopic.php?f=104&t=8611
Thank you for viewing https://helpinlinux.com
Creating Amazon Relational Database Service instance
May 12th, 2014Hello,
The following steps will help us create RDS instance in AWS. I personally don’t recommend having RDS unless you are building a very high database cluster environment. You can use EC2 and instance database services, Just because it costs nearly double to that of your EC2 instance and has very limited level of access. Reference: http://dba.stackexchange.com/questions/34525/amazon-rds-for-mysql-vs-installing-mysql-on-an-amazon-ec2-instance .
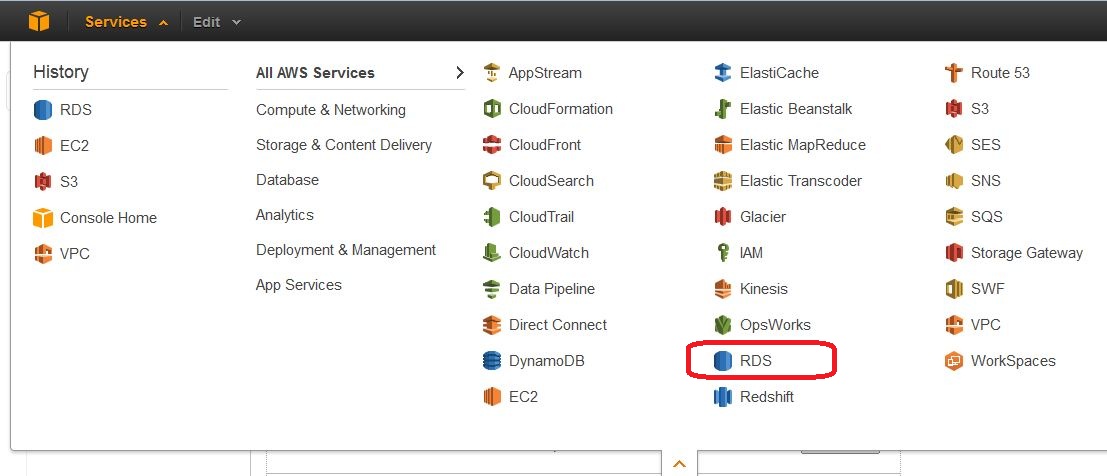
1. Login to Amazon Web Services and choose Services, you will have various services that are offered by Amazon choose RDS from that, as shown below.
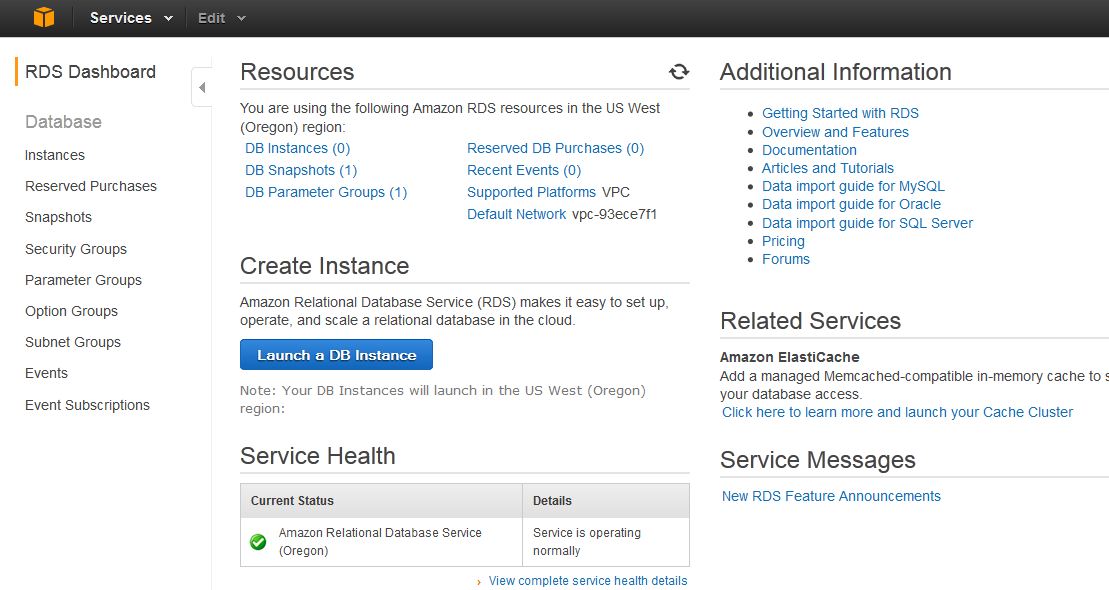
2. Once you clicked on it, you will be taken to a page similar to the one shown below. Choose instance tab from this.
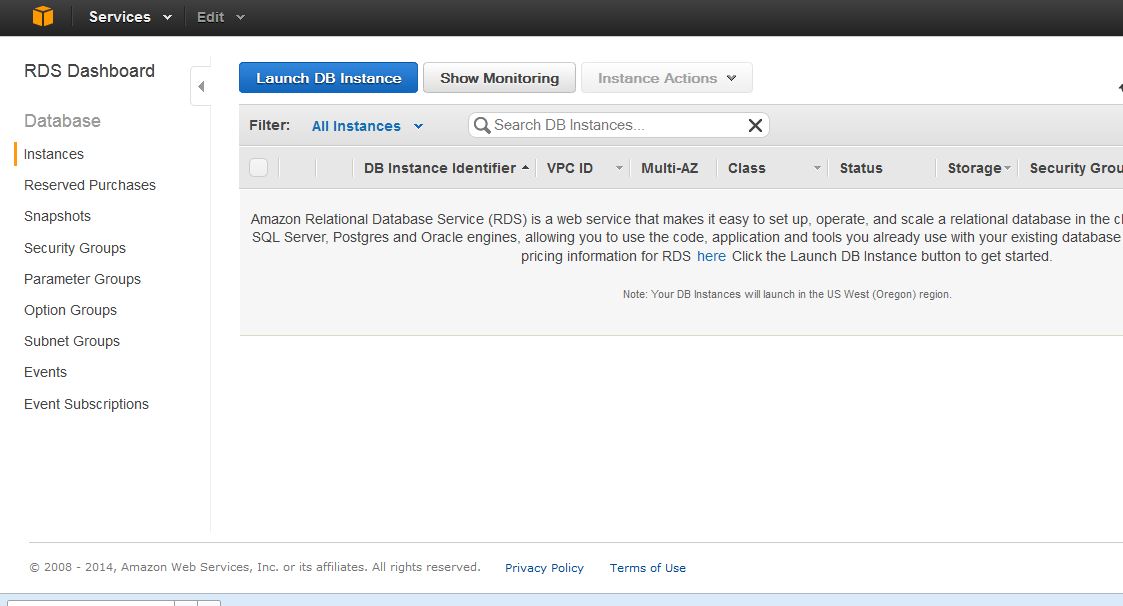
3. Click on Launch DB instance from the page similar to the one shown below.
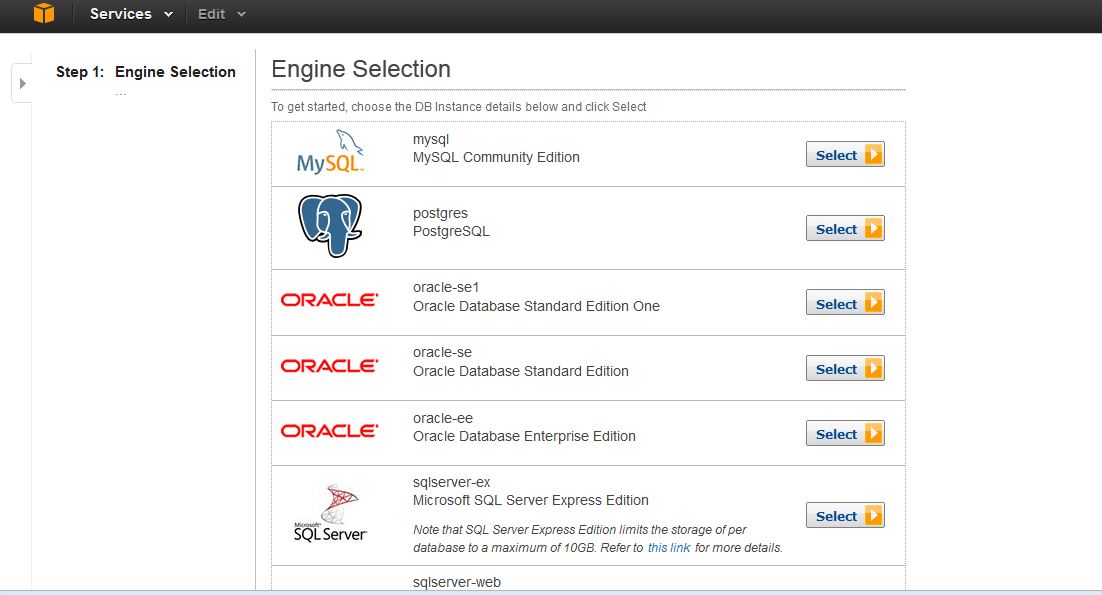
4. Now, you need to choose your database software preferences, I am choosing MySQL for now.
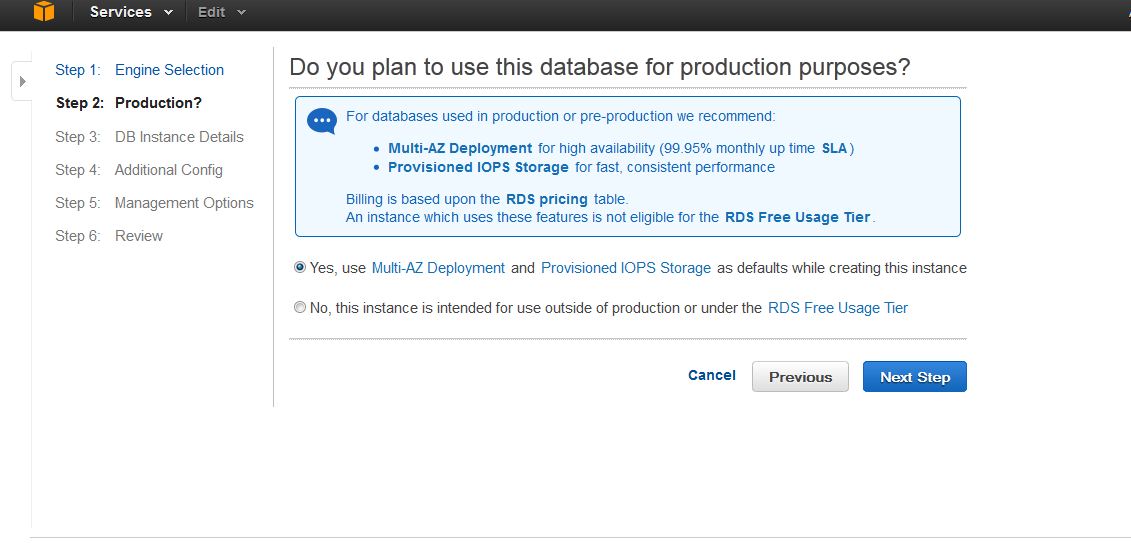
5. If you are using your server for production which requires better IO performance for read and write data, I recommend you to click “Yes, use Multi-AZ Deployment for high availability”(yes, it costs you more).
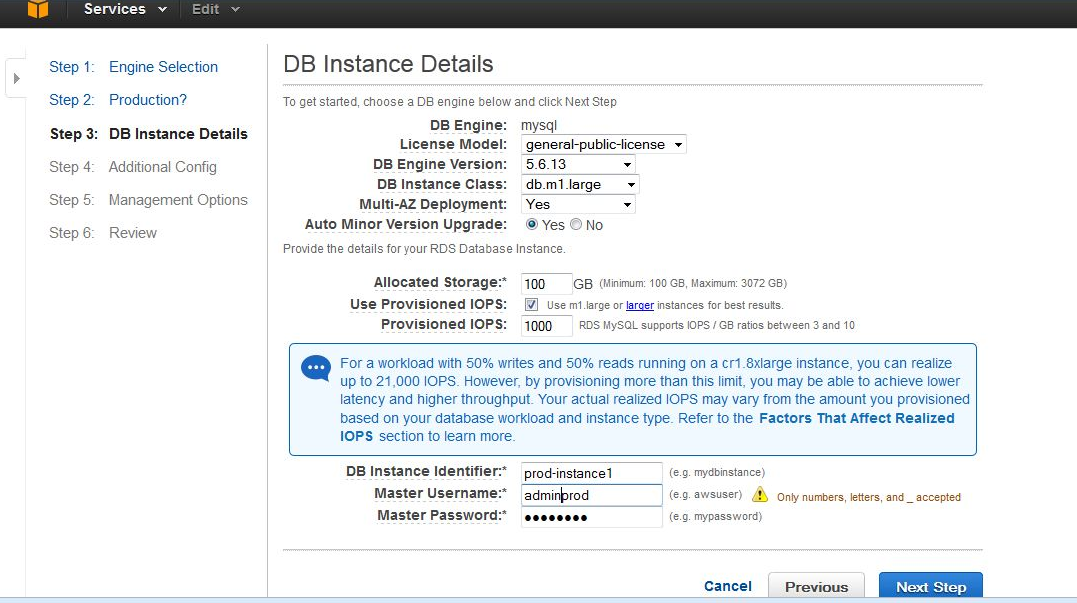
6. Now, choose/provide all the database information as shown in the image below.

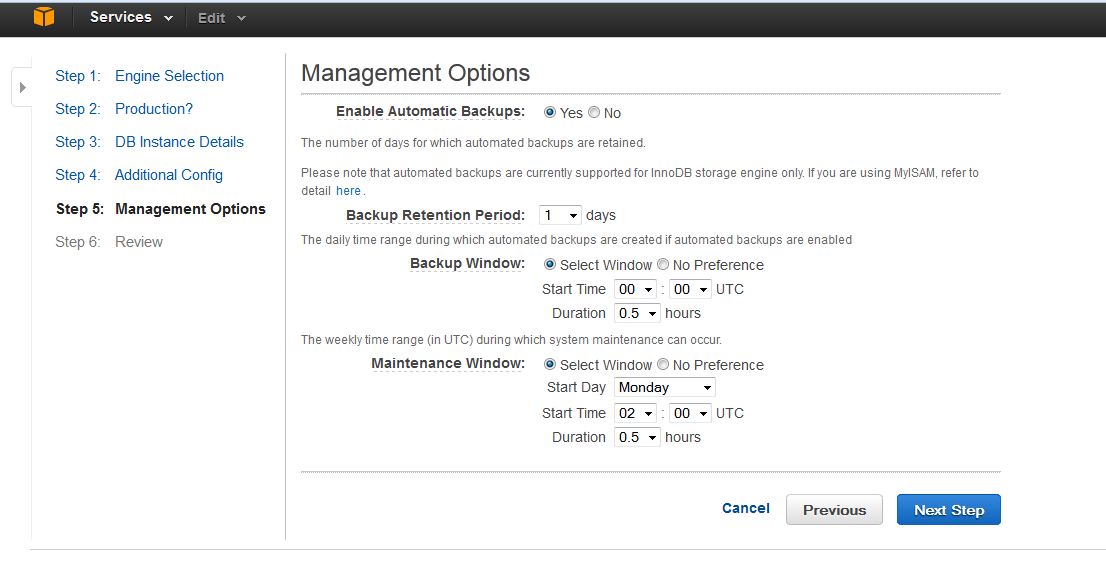
7. Enable backup if you wish to, you will need to mention the database maintenance time if any, that do not overlap with the database backup time.
8. Review and launch.
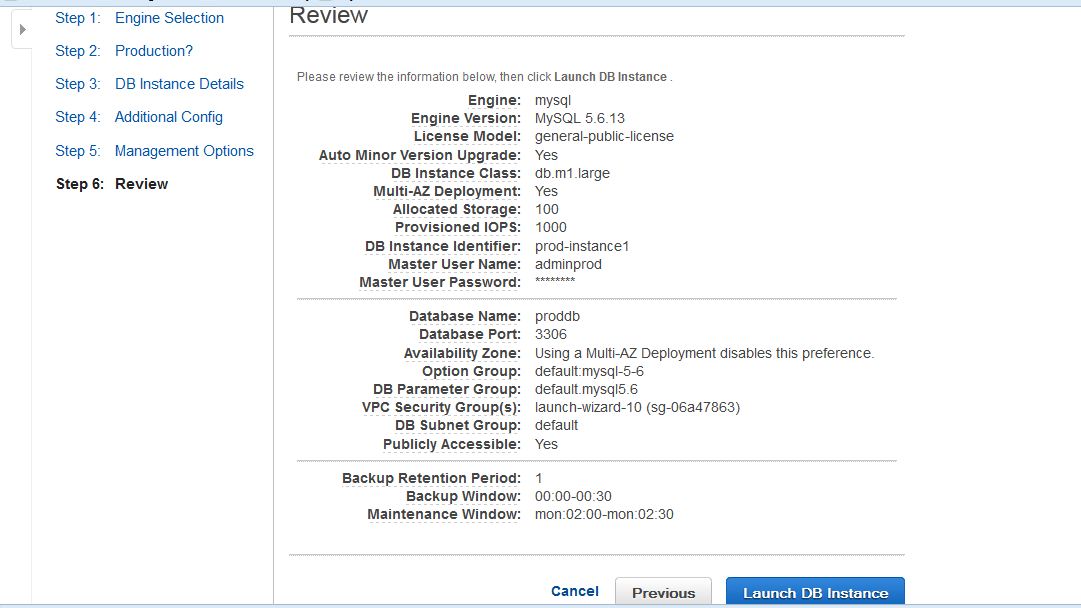
Yay !!! You have your RDS server now. You a MySQL client to connect to the database server, the hostname will be a fully qualified domain name that you can see from the instance.
Thank you for viewing https://helpinlinux.com
AWS EC2 instance resources increasing/decreasing
May 10th, 2014Hello,
I have searched over the internet and actually couldn’t find a easy post that helps users to increase EC2 instance’s resources. [Note: Please take a snapshot of your instance before changing the plan, just in case if something goes wrong we can restore it where we left].
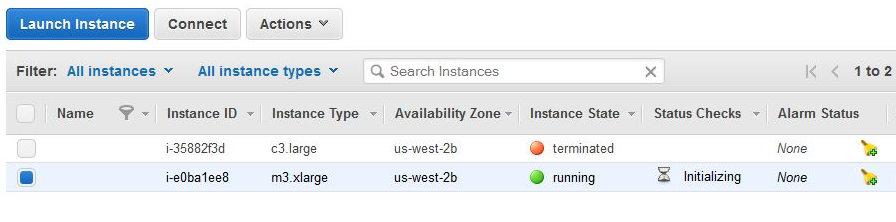
1. Login to Amazon EC2 interface and select the instance column. You will get a similar view as shown below.
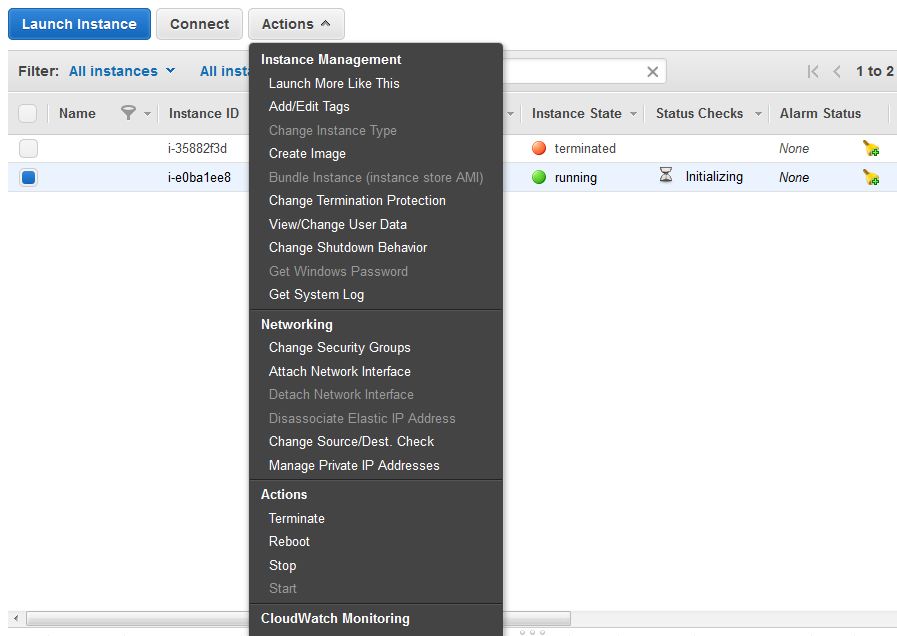
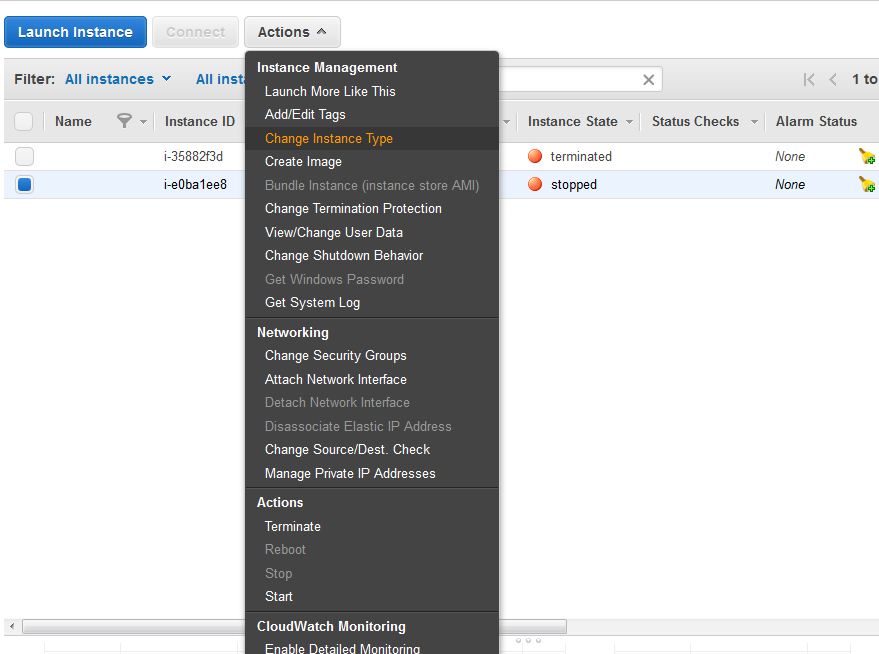
2. Select the desired instance and click on Actions tab, you will get the below options. Click on stop.( yes, you need to stop the instance to change its resources.
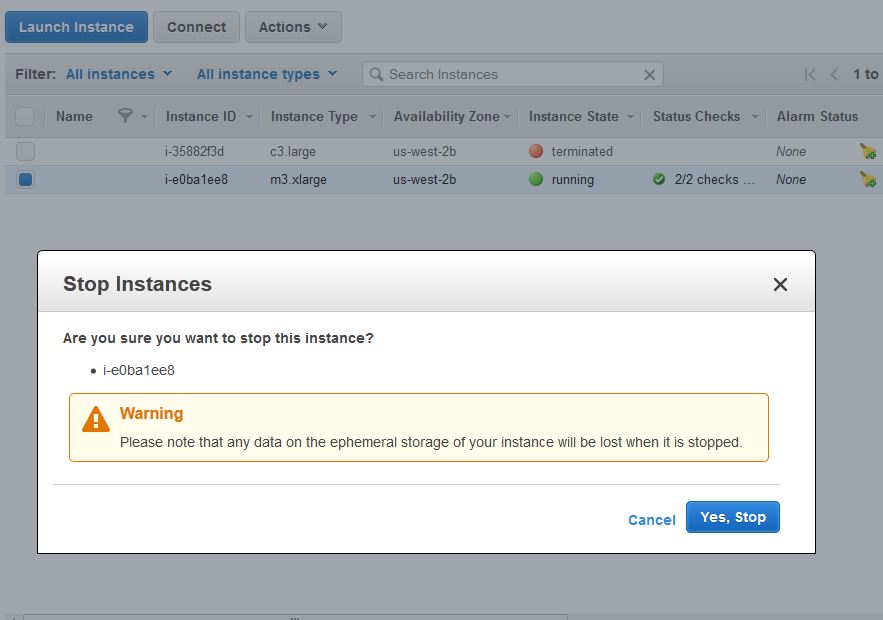
3. You will be prompted to confirm stopping of instance.
4. Once you have stopped the instance click on Actions again, where you need to select Change Instance type(which will be disabled when the instance is running). check below.
5. Choose the instance plan to which you want to upgrade/downgrade to and apply {Note: Checking EBS-optimised will get a better IO for your instance, it costs more though).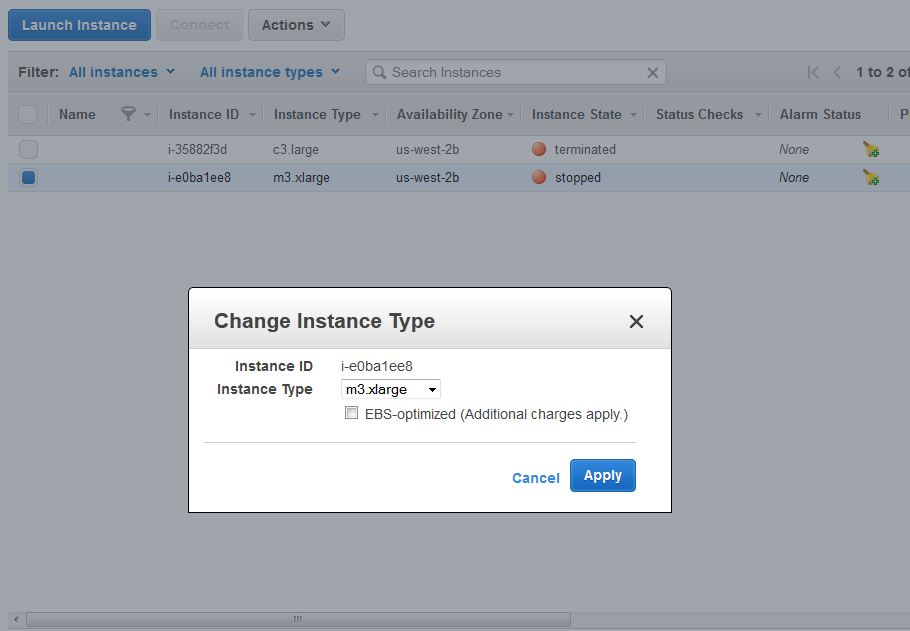
6. Now, start the instance, it will have the new resources as chosen.
Thank you for viewing https://helpinlinux.com